Wrap It Up Sustainably: A Comprehensive Guide to DIY Beeswax Wraps

Table of Contents
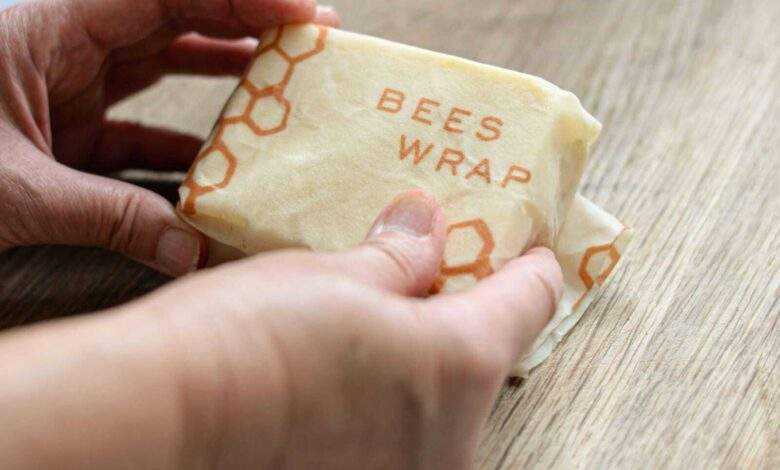
Crumpled plastic wrap clinging to your lunchbox, a familiar sight? We’ve all been there. Yet, a revolution is brewing in kitchens across the globe, a revolution armed with a natural wonder – beeswax! This guide empowers you to ditch the plastic and embrace a sustainable future with DIY beeswax wraps.
Imagine wrapping your cheese with the gentle touch of nature, sealing your veggies with a touch of honeycomb magic. DIY beeswax wraps aren’t just about saving the planet (although that’s a massive bonus!), they’re about rediscovering the beauty of reusability and crafting something beautiful with your own hands.
Whether you’re a seasoned eco-warrior or simply curious about ditching plastic, this guide unveils the secrets of creating your own beeswax wraps. We’ll walk you through the process step-by-step, from gathering supplies to customizing your wraps with stunning fabrics.
Learn about the magic of beeswax and its natural properties that keep your food fresh. Explore tips for troubleshooting common issues and discover the endless possibilities of using your wraps. But most importantly, join a community of individuals passionate about reducing plastic waste and embracing a more sustainable future, one beeswax wrap at a time!
Unveiling the Plastic Problem: Why Ditch the Wrap?
A. The Drowning in Plastic
Plastic pollution is a global crisis, with over 8 million metric tons of plastic entering the ocean annually. Single-use plastics, including plastic wrap, significantly contribute to this problem. The convenience of plastic wrap has led to its widespread use, with millions of rolls used each year, most of which end up in landfills or oceans. Plastic wrap can take up to 1,000 years to decompose, during which it breaks down into microplastics that harm marine life and ecosystems. Marine animals often mistake plastic for food, leading to ingestion, suffocation, and death.
According to the Ellen MacArthur Foundation, by 2050, there could be more plastic than fish in the ocean by weight. This startling statistic highlights the urgent need for alternatives to single-use plastics. Plastic pollution not only threatens marine life but also enters the human food chain, potentially impacting human health.
For more information on the impact of plastic pollution, visit Plastic Pollution Coalition and Ocean Conservancy.
B. The Search for a Sustainable Solution
As awareness of plastic pollution grows, so does the search for sustainable alternatives. Reusable food wraps, particularly beeswax wraps, have emerged as a popular solution. These wraps are made from natural materials and can be reused for up to a year, drastically reducing the need for single-use plastic wrap. Beeswax wraps are not only eco-friendly but also versatile and effective in preserving food.
Beeswax wraps are biodegradable and can be composted at the end of their life cycle. They help reduce plastic waste and support a zero-waste lifestyle. Many eco-conscious consumers are turning to beeswax wraps as part of their efforts to live more sustainably.
Explore sustainable living tips and products at Sustainable Jungle and EcoWatch.
C. Beeswax: Nature’s Gift for Sustainability
Beeswax, a natural substance produced by bees, has unique properties that make it ideal for creating reusable food wraps. It is biodegradable, has a low environmental impact, and provides a breathable yet protective seal for food. Supporting beekeeping practices through the use of ethically sourced beeswax promotes biodiversity and the health of bee populations. For those seeking vegan alternatives, plant-based options like soy wax are also available, offering similar benefits.
Beeswax is harvested from honeycombs during the honey extraction process. Ethically sourced beeswax ensures that beekeeping practices are sustainable and do not harm bee populations. By choosing beeswax wraps, consumers support beekeepers and contribute to the preservation of bees, which are vital for pollination and maintaining biodiversity.
For more information on the benefits of beeswax and sustainable beekeeping, visit Bee Culture and The Honeybee Conservancy.
The Magic Behind the Wrap: Understanding Beeswax Wraps
A. The Power of the Blend
Creating DIY beeswax wraps involves a few simple ingredients: beeswax, fabric, and natural oils (such as pine rosin or jojoba oil). Beeswax is the primary ingredient, providing a natural coating that protects and preserves food. The natural oils help make the wrap pliable and sticky enough to create a seal. Choosing high-quality, breathable fabric is crucial for optimal performance, as it allows the wrap to mold around food and containers while keeping food fresh.
When selecting fabric, opt for 100% cotton or other natural fibers. These materials are breathable, allowing the wrapped food to stay fresh while preventing mold growth. Pine rosin adds tackiness, enhancing the wrap’s ability to stick to itself and create a seal. Jojoba oil, on the other hand, conditions the fabric and makes it more pliable.
For detailed DIY recipes and techniques, visit Wellness Mama and Martha Stewart.
B. Beeswax Wrap Benefits Beyond Sustainability
Beeswax wraps offer several advantages over plastic wrap. They create a natural seal around food, keeping it fresh for longer periods by allowing it to breathe. This helps prevent mold and bacteria growth. Additionally, beeswax has antibacterial properties, though research on this is limited. Beeswax wraps are also reusable, reducing waste and saving money in the long run.
The breathable nature of beeswax wraps makes them ideal for storing cheese, fruits, vegetables, and bread. They help maintain the natural moisture balance of food, extending its freshness. Unlike plastic wrap, beeswax wraps do not cling to food or leave residue, making them a cleaner and healthier option.
Discover more benefits of beeswax wraps at Mindful Momma and Ethical Consumer.
C. The Versatility of Wraps
DIY beeswax wraps are incredibly versatile. They can be used to cover bowls, wrap sandwiches, and store fruits and vegetables. They are perfect for packing lunches, snacks, and leftovers, promoting zero-waste practices both at home and on the go. The wraps can also be folded into pouches or used as a lid for jars, making them a practical addition to any kitchen.
Beeswax wraps are also useful for covering rising dough, wrapping cutlery for picnics, and protecting food from pests during outdoor activities. Their versatility and durability make them a staple for anyone looking to reduce plastic use and embrace sustainable living.
For more tips on using beeswax wraps, visit The Zero Waste Chef and Trash is for Tossers.
DIY Beeswax Wrap Creation: A Step-by-Step Guide
A. Gathering Your Supplies
To create your own beeswax wraps, you will need the following materials:
- Beeswax pellets or grated beeswax
- Fabric squares (preferably 100% cotton)
- Natural oil (pine rosin or jojoba oil)
- Baking sheets
- Parchment paper
- Paintbrush
- (Optional) Cookie cutters for shaping
When choosing fabric, opt for breathable, natural fibers like cotton. You can use new fabric or repurpose old cotton shirts, sheets, or pillowcases. Consider selecting fabrics with fun patterns or colors to make your wraps visually appealing.
For sustainable fabric options, check out Organic Cotton Plus and The Fabric Store.
B. The Beeswax Bath (Oven Method)
- Preheat the Oven: Preheat your oven to 200°F (93°C).
- Prepare the Baking Sheet: Line a baking sheet with parchment paper.
- Melt the Beeswax: Place the beeswax pellets or grated beeswax on the parchment paper. Add a few drops of your chosen natural oil. Place the baking sheet in the oven and allow the beeswax to melt completely, which should take about 10-15 minutes.
C. Infusing Fabric with Goodness
- Coat the Fabric: Once the beeswax is melted, use a paintbrush to coat your fabric square with the beeswax mixture. Ensure even distribution by brushing the wax from the center outwards. Be careful not to saturate the fabric, as this can make it too stiff.
- Adjust Coverage: Depending on the intended use of the wrap, you may want a thicker or thinner coating. For bowls, a thicker coating is preferable, while a thinner layer works well for wrapping sandwiches.
D. The Cooling Down and Shaping Up
- Cool and Dry: Transfer the coated fabric squares to a clean surface lined with parchment paper to dry and cool completely. This should take about 5-10 minutes.
- Shape Your Wraps: If desired, use cookie cutters to create specific shapes. Simply press the cookie cutter into the wax-coated fabric while it is still slightly warm.
For more detailed instructions and visual guides, visit Beeswax Wraps Co. and The Art of Doing Stuff.
Beyond the Basics: Exploring Variations and Alternatives
A. The Stovetop Symphony (Alternative Melting Method)
For those without an oven, the stovetop method is an excellent alternative.
- Create a Double Boiler: Place a heat-resistant bowl over a saucepan filled with water. The water should not touch the bottom of the bowl.
- Melt the Beeswax: Add beeswax pellets and a few drops of natural oil to the bowl. Heat the water in the saucepan until the beeswax melts, stirring occasionally.
- Coat the Fabric: Once melted, follow the same steps to coat your fabric squares using a paintbrush.
The stovetop method allows for more control over the melting process and can be a convenient alternative for small batches of wraps.
For more alternative methods and tips, visit DIY Natural and Zero Waste Nerd.
B. The Vegan Vibe: Exploring Sustainable Alternatives
For those seeking vegan options, plant-based waxes like soy wax can be used instead of beeswax. Soy wax is derived from soybeans and offers similar properties to beeswax. However, it may have different melting points and adhesive qualities, so some experimentation may be necessary to achieve the desired results. As research on sustainable, plant-based alternatives continues,
new options are becoming available, making it easier for everyone to make eco-friendly choices.
Soy wax wraps are less sticky than beeswax wraps but still effective in keeping food fresh. They are also biodegradable and compostable, making them an excellent choice for eco-conscious consumers.
Explore vegan alternatives and recipes at One Green Planet and Vegan Society.
C. Aromatic Enhancements: Adding Essential Oils (Optional)
For a touch of fragrance and potential antibacterial properties, you can add essential oils to your beeswax wraps. Ensure you use food-grade essential oils and dilute them with a carrier oil for safety. Lavender and rosemary are popular choices due to their mild properties. However, essential oils should be used sparingly and not come into direct contact with food.
- Dilute Essential Oils: Mix a few drops of essential oil with a carrier oil (such as coconut oil).
- Add to Beeswax Mixture: Add the diluted essential oil to the melted beeswax before coating the fabric.
- Ensure Safety: Research potential allergies and avoid using essential oils if unsure about their safety.
For more on the safe use of essential oils, visit Tisserand Institute and AromaWeb.
Getting the Most Out of Your Wraps: Care and Maintenance
A. The Gentle Touch: Cleaning Your Wraps
Proper care and maintenance are essential to extend the life of your DIY beeswax wraps. After each use, clean your wraps with cool water and mild dish soap. Avoid using hot water or harsh chemicals, as these can damage the wax coating. Gently scrub with a soft sponge and rinse thoroughly. For an extra touch of cleanliness, you can sanitize your wraps with a diluted vinegar solution.
- Cool Water Wash: Rinse the wrap under cool water to remove food residue.
- Mild Soap: Apply a small amount of mild dish soap and gently scrub with a soft sponge.
- Rinse and Air Dry: Rinse thoroughly and hang to air dry.
For more cleaning tips, visit Good Housekeeping and The Kitchn.
B. The Art of Storage
Proper storage ensures that your beeswax wraps remain effective and last longer. Store your wraps in a cool, dry place away from direct sunlight and heat sources. You can keep them in a dedicated container or drawer for easy access and organization. Avoid folding them too tightly to prevent cracking.
- Cool and Dry: Store wraps in a cool, dry place.
- Avoid Heat: Keep away from direct sunlight and heat sources.
- Organize: Use a dedicated container or drawer for storage.
For more storage solutions, visit Apartment Therapy and The Spruce.
C. Knowing When to Let Go: Recognizing When Wraps Need Replacing
Beeswax wraps have a lifespan of about a year with proper care. However, over time, they may show signs of wear and need replacing. Look for significant cracking, loss of adhesion, or diminished ability to create a seal. When it’s time to dispose of your wraps, consider composting the fabric (if it is natural) and responsibly disposing of the leftover wax.
- Check for Wear: Look for cracking, loss of adhesion, and reduced sealing ability.
- Responsible Disposal: Compost the fabric if natural and dispose of wax responsibly.
For more on composting and disposal, visit EPA’s Composting Guide and Gardeners’ World.
Troubleshooting Your Wraps: Conquering Common Issues
A. The Patchy Problem: Addressing Uneven Wax Distribution
Uneven wax distribution can occur due to fabric saturation or improper application. To fix this, reapply a thin layer of wax using a warm iron (with parchment paper) or a hairdryer to melt and redistribute the existing wax. Ensure an even spread by brushing from the center outwards.
- Reapply Wax: Use a warm iron or hairdryer to melt and redistribute the wax.
- Even Spread: Brush wax from the center outwards for even coverage.
For more troubleshooting tips, visit Beeswax Wraps Australia and The Herb Cottage.
B. The Sticky Situation: Dealing with Excessive Wax
Excessive wax application can make your wraps overly sticky. To reduce stickiness, place the wrap between clean towels and apply gentle pressure. Alternatively, use a cool iron (with parchment paper) to absorb excess wax. This should make the wrap more manageable and less sticky.
- Pressure Technique: Place wrap between towels and apply gentle pressure.
- Cool Iron: Use a cool iron to absorb excess wax.
For more solutions to excessive wax, visit My Zero Waste and Waste Free Land.
C. The Not-So-Fresh Feeling: Addressing Unpleasant Odors
Unpleasant odors can develop on beeswax wraps due to contact with strong-smelling foods or improper cleaning. To eliminate odors, air the wraps out, use a baking soda wash, or add a few drops of diluted lemon essential oil (with caution). Proper cleaning and storage can prevent odors from developing.
- Air Out: Hang the wraps to air out and eliminate odors.
- Baking Soda Wash: Wash wraps with a baking soda solution.
- Essential Oils: Add a few drops of diluted lemon essential oil for a fresh scent.
For more odor-eliminating tips, visit Simple Green and Goodnet.
Gifting Green: Sharing the Joy of DIY Beeswax Wraps
Gifting DIY beeswax wraps is a thoughtful and sustainable choice. Create beautiful wraps using patterned fabric and add personalized touches for a unique gift. You can also create a DIY beeswax wrap kit with all the necessary materials and instructions, making it easy for others to start their own sustainable journey.
- Patterned Fabric: Choose fun patterns or colors for your wraps.
- Personalized Touches: Add personalized tags or instructions.
- DIY Kits: Include materials and instructions for a complete gift.
For more eco-friendly gift ideas, visit Eco Warrior Princess and Ethical Superstore.
The Wrap Up: A Sustainable Future, One Wrap at a Time
DIY beeswax wraps offer numerous benefits, from reducing plastic waste to supporting sustainable practices. By making your own wraps, you contribute to a zero-waste lifestyle and promote eco-friendly living. Celebrate your accomplishment and inspire others by sharing your experiences and encouraging them to join the movement towards a plastic-free kitchen.
- Reduce Plastic Waste: Beeswax wraps are a sustainable alternative to plastic wrap.
- Promote Sustainability: Support sustainable living and eco-friendly practices.
- Inspire Others: Share your experiences and encourage others to adopt sustainable habits.
For more information on sustainable living and zero-waste practices, visit Zero Waste Home and Sustainable Living Guide.
The Big Buzz on Beeswax: Exploring Sustainability Beyond the Wrap
Bees play a crucial role in maintaining biodiversity and supporting ecosystems through pollination. However, bee populations face numerous threats, including habitat loss, pesticide use, and climate change. By choosing ethically sourced beeswax products, consumers support beekeeping practices that promote the health and sustainability of bee populations. Get involved in local beekeeping initiatives to contribute to this vital cause and help protect our planet’s pollinators.
- Support Beekeeping: Choose ethically sourced beeswax products.
- Protect Pollinators: Contribute to bee sustainability and biodiversity.
- Get Involved: Participate in local beekeeping initiatives.
For more on beekeeping and bee sustainability, visit Bee Informed Partnership and Pollinator Partnership.
Frequently Asked Questions: Demystifying the Magic of DIY Beeswax Wraps
1. Are DIY beeswax wraps truly effective?
Absolutely! Beeswax wraps create a natural seal around food, keeping it fresh for extended periods. They’re perfect for wrapping cheese, sandwiches, fruits, and vegetables.
2. What are the advantages of using DIY beeswax wraps over plastic wrap?
The benefits are numerous! Beeswax wraps are:
- Sustainable and reusable: Unlike plastic wrap, which ends up in landfills, beeswax wraps can be used hundreds of times.
- Eco-friendly: They’re made from natural ingredients and don’t contribute to plastic pollution.
- Breathable: This allows your food to breathe naturally, preventing spoilage and preserving freshness.
- Durable and long-lasting: With proper care, your DIY beeswax wraps can last for a year or more.
- Versatile: They can be used for a variety of food storage needs, from wrapping vegetables to covering bowls.
3. What are some of the limitations of DIY beeswax wraps?
Beeswax wraps aren’t a perfect replacement for every situation. Here are some things to keep in mind:
- Not suitable for raw meat or fish: Due to hygiene concerns, it’s best to avoid using beeswax wraps with raw meat or fish.
- Not ideal for liquids: The wraps aren’t leakproof, so avoid using them for soups, sauces, or watery foods.
- Heat sensitivity: Beeswax melts at relatively low temperatures. Avoid using them for hot foods or microwaving them.
4. What type of fabric should I use for my DIY beeswax wraps?
Choose a tightly woven, breathable fabric like 100% cotton or hemp. Avoid synthetic fabrics like polyester, as they won’t allow the wax to adhere properly.
5. Can I add essential oils to my beeswax wraps for fragrance?
Yes, you can! However, be cautious. Use only food-grade essential oils diluted with a carrier oil like jojoba oil. Avoid strong oils or using them directly on food. Patch test your wraps on an inconspicuous area to ensure there’s no fabric damage.
6. How do I clean my DIY beeswax wraps?
Cleaning your wraps is simple! Wash them in cool water with mild dish soap and a soft sponge. Avoid hot water, harsh chemicals, and dishwashers, as these can damage the wax coating. Allow them to air dry completely before storing.
7. How long will my DIY beeswax wraps last?
With proper care, your wraps can last for a year or more. Signs indicating replacement include significant cracking, loss of adhesion, or diminished ability to create a seal.
8. What do I do with used beeswax wraps?
Once your wraps reach the end of their lifespan, you can responsibly dispose of them. Depending on the fabric, you might be able to compost it (check for synthetic materials). The leftover beeswax can be composted in small quantities (again, check your local guidelines) or disposed of in general waste.
9. Is there a vegan alternative to beeswax wraps?
Yes! Plant-based waxes like soy wax can be used to create vegan wraps. These may have slightly different properties than traditional beeswax wraps, but they offer a sustainable alternative.
10. Where can I find more information about DIY beeswax wraps?
We’ve got you covered! Check out the Resources section of this guide for a list of helpful websites and blogs offering additional tips and inspiration. Let’s continue the conversation! Share your DIY experiences and questions in the comments below.
Congratulations! You’ve just taken a powerful step towards a greener future. By crafting your own DIY beeswax wraps, you’re not just reducing plastic waste in your own kitchen, you’re sending a powerful message about sustainability.
These reusable wonders are a testament to the beauty of natural solutions. Witness the joy of wrapping your cheese with a touch of honeycomb magic, or sending your kids off to school with a lunch packed in eco-friendly style.
The journey doesn’t end here! Share your DIY triumphs with friends and family, inspire them to join the movement. Consider gifting beautifully crafted wraps for birthdays and holidays, spreading the buzz about sustainable living. Remember, every plastic wrap replaced with a beeswax friend is a victory for our planet.
So, keep those wax pots bubbling, keep those creative juices flowing, and let’s celebrate the power of DIY beeswax wraps to seal the deal on a more sustainable future, together! Don’t forget to share your creations on social media using #DitchPlasticWrap, let’s inspire the world to embrace the buzz!


