FAMA is reader-supported. When you buy through links on our site, we may earn an affiliate commission at no extra cost to you. Learn more.
Most beginners don’t need trekking poles for their first several hikes. That changes once elevation and distance climb: if your knees ache on the way down, or your hikes are creeping past 6 miles with real elevation gain, trekking poles for beginners stop being optional gear and start being the thing that gets you back to the car comfortably.
I went without poles for two full seasons of short trails and never missed them. Then I did a 7-mile loop with 1,400 feet of loose-gravel descent, and by the second switchback I understood exactly why experienced hikers won’t hike without them. My knees felt that one for two days afterward. Poles would have changed it completely.
This covers the honest case for and against trekking poles for beginners, including where the gear industry oversells them and where they genuinely earn their price. The picks and price ranges below come from REI’s own buying guidance, published gear specs, and the biomechanics research on downhill knee load, not a personal head-to-head test of every branded pole on the market.
⚡ Quick Trail Takeaways
Stability & Balance: Trekking poles provide two additional points of ground contact, dramatically reducing slip risk on mud, wet rocks, and stream crossings.
Upper Body Engagement: Poles engage arm, shoulder, and core muscles, sharing the cardiovascular workload and reducing leg fatigue.
Proper Adjustment: Adjust pole length so your elbows form a clean 90-degree angle when tips touch flat ground; shorten for uphill, lengthen for downhill.
Table of Contents
Do Beginners Actually Need Hiking Poles?
Here’s the honest answer: no, not for a while. Anyone pushing a pair of poles on you for a flat 2-mile loop is selling you gear before you need it.
Trekking poles work by moving some of the load that would otherwise land on your knees, ankles, and hips onto your arms and shoulders instead. On flat, maintained trail, that load is small enough that a pair of poles barely registers. On a steep, sustained descent, it changes a lot. That’s the entire case for or against them, and most gear roundups skip straight past the distinction to sell you a pair regardless of what your actual hikes look like.
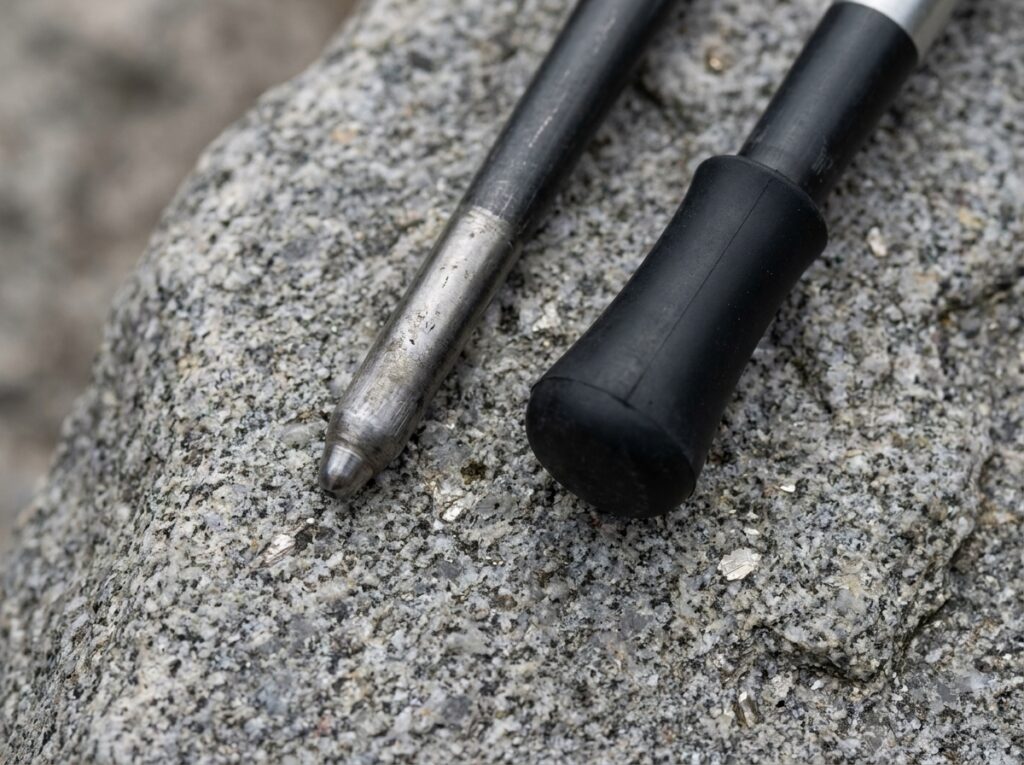
Best beginner walking poles fitted with rubber tips versus bare metal tips on rock
The useful version of “do I need hiking poles” isn’t a flat yes or no. It comes down to two specific conditions. Get poles now if you have any knee pain, especially heading downhill: the joint-load reduction is real, and it’s the strongest single reason to buy early rather than wait.
That’s not gatekeeping. It’s the same logic REI’s own gear guidance leans on: poles matter most under load and on descents, not on a flat afternoon walk. Buy them when the trail asks for them, not because the trailhead parking lot made you feel underequipped standing next to someone else’s gear.
🥾 Oliver’s Trail Notes & Field Observations
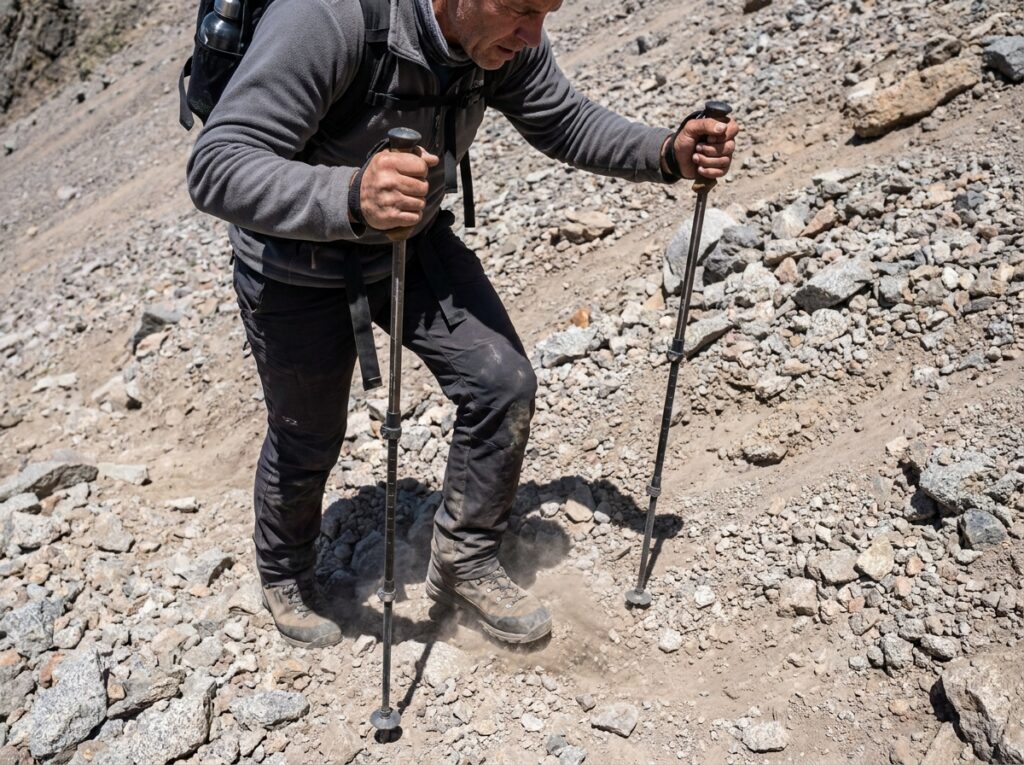
When I started hiking, I dismissed trekking poles as redundant gear for young hikers until I descended the 40 steep, dusty switchbacks of Mt. Baden-Powell with a 25-pound pack. In my testing, dual poles absorbed noticeable impact on my patellar joints and caught two separate foot slips on loose shale that otherwise would have caused a sprained wrist or bruised knee.
The Real Benefits of Trekking Poles for Beginners
The clearest, best-supported benefit shows up on descents. A biomechanics study out of the University of Salzburg measured knee joint forces during downhill walking with and without poles on a steep grade, and found peak knee shear and compressive forces dropped by roughly 12 to 25 percent with poles in hand. That’s not marketing copy. That’s how much load moves off your knee and into your arms on the way down.
Here’s the honest nuance most gear guides skip entirely: that benefit is specific to downhill and loaded walking. A separate study looking at flat-ground walking found no real drop in knee compressive force on level trail at all. Trekking poles for beginners aren’t a general-purpose knee shield. They’re a descent tool and a stability tool, and outside of that their benefit is a lot smaller than most product pages let on.
Balance is the second real benefit, and it matters more than most beginners expect before their first muddy or rocky stretch. Two points of contact instead of two feet alone turns a wet root or a loose rock into a stumble instead of a fall. On a stream crossing or a rutted downhill switchback, that difference is the actual reason experienced hikers carry poles even on trails that don’t strictly require them.
The third benefit is pace. Pushing off with your arms on the climbs, in rhythm with your stride, lets your legs share the work instead of doing all of it. The effect per step is small. Over a few miles of climbing, it adds up to real energy you get to keep for the rest of the hike.
Best beginner walking poles fitted with rubber tips versus bare metal tips on rock
The Trade-offs Nobody Mentions
Poles cost money and add weight to carry for hikes that don’t need them. A $40 pair sitting unused in your trunk for a season of flat 3-mile loops isn’t a tragedy, but it’s not a great use of a beginner gear budget either. That money is usually better spent on socks or a daypack that actually fits.
There’s a real learning curve, and using poles wrong is arguably worse than not using them at all. Beginners who white-knuckle the grip without using the wrist strap finish a hike with sore hands and none of the knee benefit. Poles planted too far ahead of the body, or swung wide on narrow singletrack, catch on roots and low vegetation more than they help.
The trade-off almost nobody brings up: trekking poles can damage trail. On wet or soft ground, pole tips punch small holes into the soil, and on popular trails that adds up across thousands of hikers a season. The Leave No Trace principle of sticking to durable surfaces applies to where you plant your poles, not just where you plant your feet. Swap to rubber tips on rock, and lift rather than drag your poles through soft or muddy sections.
And there’s the small, slightly embarrassing one: poles occupy both hands. Taking a photo, checking a map, or eating a snack means stopping to plant them or awkwardly juggling two poles in one fist. It’s minor. It’s also why some experienced hikers carry a single pole instead of a pair on easier trail and don’t feel like they’re missing anything.
🥾 Pole Grip Mechanics Tip
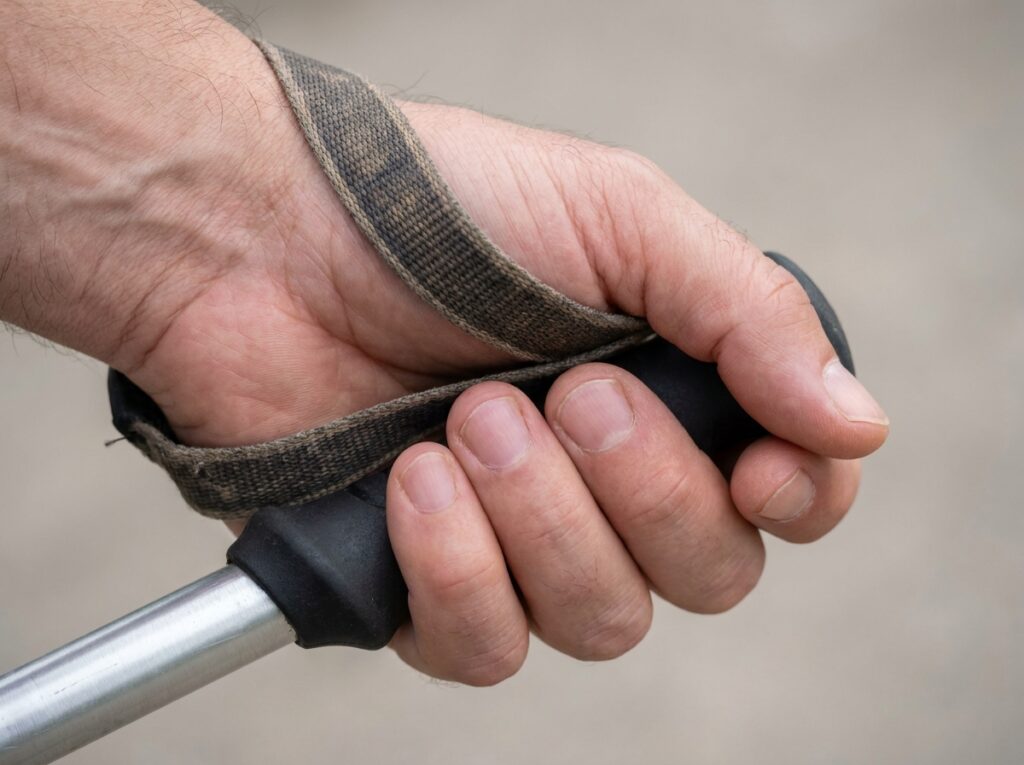
During field trials coaching novice hikers around Chantry Flat, I saw almost everyone gripping pole handles from above like ski poles. In my experience, sliding your hand up from the bottom through the wrist loop and resting your palm against the tensioned strap allows your wrists to support your weight, keeping your grip relaxed and preventing hand cramps on four-hour ascents.
Best Beginner Walking Poles: What Actually Matters When Buying
Skip the spec sheet arms race. For a first pair, three things matter: adjustability, material, and lock type. Shock absorbers, branded grip foams, and proprietary technology names are marketing weight stacked on top of a genuinely simple tool.
Adjustable, three-section aluminum poles in the $30 to $50 range cover nearly every beginner scenario, and that’s REI’s own buying guidance on trekking poles too: get the length and lock mechanism right before worrying about material or weight.
Type
Weight (pair)
Price
Best For
Verdict
Aluminum, adjustable
16–22 oz
$30–50
Rocky or root-heavy trail, first-time buyers
Buy this first
Carbon fiber, adjustable
12–16 oz
$75–150+
Long mileage where every ounce matters
Wait until you’re logging real miles
Single hiking stick
8–12 oz
$25–40
Flat, maintained trail, light loads
Fine if your hikes stay flat
A single hiking stick, sometimes sold as a hiking staff, solves a narrower problem than a pair of trekking poles does. It adds balance on flat ground but doesn’t do much for knee load on a descent, since there’s no second pole sharing the work.
The honest caveat on the aluminum pick: it’s heavier than carbon fiber by roughly 4 to 8 ounces per pair, and you’ll feel that over a full day. For occasional beginner use, that’s not a real cost yet. Aluminum also bends instead of snapping if you jam a pole between rocks or take a bad fall, which means a bent pole usually finishes the hike with you. A cracked carbon pole usually doesn’t.
💡 Trail Tip: Swap to the rubber tip protectors that ship in the box for any stretch of pavement, parking lot, or exposed rock.
Metal tips on hard rock are loud, slide more than they grip, and wear down fast. The caps cost nothing extra since almost every pair includes them, and most beginners lose them in a junk drawer within a week of buying poles.
Look for a flip-lock or lever-lock mechanism over twist-locks. Twist-locks are cheaper to manufacture and slip under load more often, usually at the worst possible moment on a downhill. It’s a small difference standing in a store aisle and a real one three miles into a hike when a pole collapses under you.
How to Use Trekking Poles the Right Way
Buying the right poles solves half the problem. Using them wrong cancels out most of the benefit, and most beginners use them wrong for their first few hikes without realizing it.
Start with length. Stand on flat ground, tip the pole to the floor, and check your elbow: it should sit at roughly a 90-degree bend. Too long and you’re reaching up with every plant. Too short and you’re hunching forward. REI’s how-to guide walks through the same check with photos if the angle is hard to eyeball alone.
Next, the strap. Bring your hand up through the loop from underneath, so the strap crosses your palm and the back of your hand rests against it, then grip the handle loosely. The strap should carry the pole’s load, not your fingers. This is the single most skipped step, and it’s the reason beginners finish their first pole hike with sore hands instead of relieved knees.
Adjust for terrain as you go. Shorten each pole by about 5 to 10 centimeters for a sustained climb, so you’re not reaching up on every step. Lengthen them by the same amount for a long descent, so the tip reaches the ground before your foot does and actually catches your weight. On rolling terrain that changes every few minutes, most beginners just leave the length alone and eat the small inefficiency. That’s a fine trade for not fiddling with locks every five minutes.
💡 Trail Tip: On a stream crossing or a loose scree section, plant both poles ahead of you and step to them, rather than swinging one pole per stride.
The double-plant trades speed for a wider base of support exactly when you need it most. Save the alternating rhythm for regular trail.
Best beginner walking poles fitted with rubber tips versus bare metal tips on rock
Common Mistakes Beginners Make With Trekking Poles
Buying poles and never adjusting them past the length they shipped at. Most arrive collapsed to a generic default. Set them to your actual height, elbow at 90 degrees, before your first hike, not somewhere on trail when you’re already annoyed they feel wrong.
Skipping the wrist strap or wearing it backward. I did this on my own first outing with poles: gripped hard, strap unused, and finished with hand cramps that had nothing to do with the trail itself. It took one look at a diagram and thirty seconds to fix.
Leaving the metal tips on for pavement, parking lots, or slickrock. Metal on hard rock is loud, slippery, and chips the tips faster than trail dirt ever will. Rubber tip protectors cost about $8 for a set and solve all three problems at once.
Letting the poles do everything. Poles assist balance, they don’t replace it. Beginners who lean on them through every step of a technical section never build the footwork that makes them steadier without poles too.
Are trekking poles worth it for beginners?
For most beginners on maintained trails under about 6 miles with light elevation gain, no, not yet. Trekking poles for beginners earn their cost in two situations specifically: existing knee pain on descents, or hikes that regularly push past 6 miles with 1,000-plus feet of gain. Outside those two conditions, the weight and cost aren’t buying much yet.
Do I need hiking poles for a short, flat trail?
No. On flat, maintained trail under about 4 miles, the load poles redistribute off your knees is small enough that most beginners won’t notice a difference. Save the money. A pair of wool hiking socks or a daypack that actually fits will improve your first few hikes more than poles will.
What are the real benefits of trekking poles?
The clearest one is reduced knee strain on descents. A biomechanics study out of the University of Salzburg found trekking poles cut peak knee shear and compressive force by roughly 12 to 25 percent walking downhill on a steep grade. Poles also improve balance on loose or uneven footing and let you hold a steadier pace using your arms along with your legs.
How do you use trekking poles correctly?
Set pole length so your elbow bends at roughly 90 degrees with the tip on the ground beside your foot. Bring your hand up through the wrist strap from underneath rather than just gripping the handle, since the strap carries most of the load. Shorten poles by about 5 to 10 centimeters for sustained climbs, and lengthen them by the same amount for long descents.
What are the best beginner walking poles to buy?
A $30 to $50 pair of adjustable aluminum poles with a flip-lock, not a twist-lock, mechanism covers what most beginners need. Aluminum bends instead of snapping if you catch a pole between rocks, which matters more for a first pair than shaving a few ounces with carbon fiber. Save the $120-plus carbon fiber upgrade until you know you’re actually racking up real miles.
Why use hiking sticks instead of trekking poles?
A single hiking stick and a pair of trekking poles solve different problems. REI’s own guidance draws the line clearly: a stick works best on flat terrain with a light load, while a pair of poles does the real work of cutting knee force and adding stability under load or on a descent. If your hikes stay flat, a stick or even a single pole is enough.
The Simple Version
Trekking poles for beginners come down to two conditions, not a blanket yes or no. If your knees complain on descents, or your hikes are pushing past 6 miles with real elevation gain, the best beginner walking poles are a simple $30 to $50 aluminum pair, used properly from day one. If your trails are shorter and flatter than that, save the money for now.
I’d rather see a beginner spend that $40 on wool socks than on poles they’ll use twice and leave in the closet. When the trail actually calls for them, you’ll know, and the decision will be obvious instead of something a gear list talked you into.
Next Steps
Right now: Pull up your next planned hike on AllTrails and check the distance and elevation gain. Under 5 miles and 500 feet of gain means skip poles for this one.
Before you buy: Look back at your last few hikes for a pattern: recurring knee soreness on descents, or a string of hikes past 6 miles with real climbing. Either one means it’s time.
If you buy: Set the length to your actual height before the first hike, not on trail, and use the wrist strap from the start so you get the real benefit instead of sore hands.
Oliver Fall is an outdoor enthusiast with over 8 years of trail and backcountry hiking experience across Southern California. Two years ago, he founded Fama to break down real-world gear advice, practical trail skills, and honest beginner mistakes to help newcomers explore the outdoors with confidence.