



Definition: Trail markers are navigational aids placed along a route to help you stay on the correct path. What trail markers mean? The short answer: they tell you where the trail goes, when it’s about to change direction, and when you’re still on the right path between signs. The longer answer is that trail markers are a whole language (painted blazes, stacked rocks, colored rectangles, double stripes, wooden posts), and once you learn to read them, you’ll never look at a trail the same way again.
⚡ Quick Trail Takeaways
- Painted Blaze Standards: Standard 2×6 inch rectangular blazes mark official paths at eye level every 100-200 yards.
- Double Blaze Warnings: Two vertical blazes indicate an alert, junction, or sharp direction change ahead.
- Flagging Tape Caution: Avoid following random plastic surveyor flagging tape, which often marks timber boundaries or game trails.
Most beginners don’t think about trail markers until they suddenly can’t find one. You’ve been following a clear dirt path, you come to a rocky section or a wide open meadow, and the obvious trail just… stops being obvious. You look around. Nothing. That moment of low-grade panic (“did I go the wrong way?”) is almost entirely avoidable once you know what to look for and how the system works.
I walked past a double blaze on my fourth hike thinking it was just some old paint someone had slapped on a tree. Kept walking straight. The trail I was supposed to be on had turned left about 40 feet back. I added half a mile of wrong-direction hiking before a passing trail runner pointed me around. The double blaze had told me exactly what I needed to know. I just didn’t speak the language yet.
This guide is that language. What different marker types signal, how blaze colors work, what to do when the markers thin out, and the three situations where markers stop being optional knowledge and become something you genuinely need.
Why Trail Markers Exist and Why the System Isn’t Consistent
Trail markers exist for a straightforward reason: trails cover terrain that doesn’t always announce itself as a trail. Rocky plateaus, creek crossings, open meadows, multiple-use forest land where dozens of user-made paths converge, and without markers, even a well-maintained trail becomes ambiguous in enough spots to cause real navigation problems.
The frustrating part of trail markers explained for beginners: no single national standard governs them. The Appalachian Trail Conservancy uses white rectangles for the main trail and blue rectangles for approach and side trails, and enforces that standard consistently across 2,190 miles. That kind of consistency is the exception, not the rule. State parks, national forests, county trail systems, and municipal parks all use their own conventions. Marker colors mean different things in different places. Shape conventions vary. Even blaze height off the ground, typically eye level, roughly 5 to 6 feet but sometimes higher to account for snow depth, varies by region.
What this means practically: before any hike, it’s worth spending 30 seconds on the AllTrails trail page or the land manager’s website to see if the marker system for that specific trail is described. National Park Service trail pages at nps.gov often note blaze colors and sign conventions. Most state park sites do the same. Knowing that the trail you’re on uses yellow blazes, not white, before you leave the trailhead means you spend the hike looking for yellow paint instead of wondering why you haven’t seen a white one in a while.
That said, most of the trail marker types described in this guide appear on trails across the country. Learn these, and you’ll be able to navigate the majority of maintained hiking trails in the United States without confusion.
🥾 Oliver’s Trail Notes & Field Observations
While tracking faint paths through dense scrub in the Angeles National Forest, I frequently encountered stacked double blazes on trail posts. In my experience, beginners miss the navigational meaning of an offset double blaze: the higher marker shifts in the direction the trail turns. If the upper paint mark is offset to the right, the path makes an immediate sharp right turn thirty feet ahead.
The 8 Types of Trail Markers You’ll Encounter
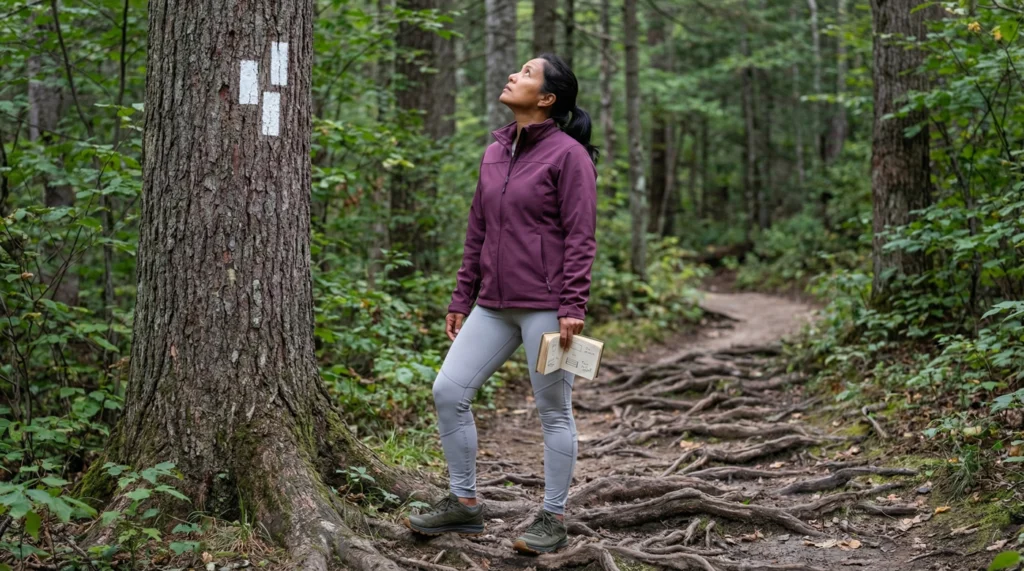
1. Single Painted Blazes: “You’re on Track”
The painted blaze is the most common trail marker in North America. It’s a rectangle of paint, typically 2 inches wide by 6 inches tall, applied to a tree at roughly eye level. On trails without many trees, you’ll find them painted on rocks or wooden posts instead.
A single blaze means one thing: the trail continues in the direction you’re already heading. It’s a confirmation marker. You’re not supposed to see one at every step, typically spaced 50 to 200 feet apart on a clear trail, closer together where the path becomes ambiguous. If you’ve been hiking for five minutes without seeing a blaze and the trail suddenly feels less defined, stop. Either you’re between markers and should keep scanning, or you’ve gone off trail and should back up to the last marker you saw.
This is the single most useful piece of beginner navigation knowledge: when in doubt, go back to the last marker you can positively identify, then look forward from there. Don’t keep walking in hope.
2. Double Blazes: “The Trail Changes Direction”
A double blaze is two painted rectangles stacked vertically on the same tree, sometimes with the top one offset slightly left or right. This is the trail marker that most beginners walk straight past, and walking straight past it is exactly the wrong move.
A double blaze means: pay attention, something is about to change. The trail is turning, a junction is coming up, or the route does something non-obvious in the next 50 to 100 feet. The offset direction of the top blaze sometimes indicates which way the turn goes (top blaze shifted right means the trail turns right), though not every trail system uses this convention consistently.
What to do when you see a double blaze: slow down and look carefully at the terrain ahead. The continuation of the trail might not be obvious. Check both directions. Look for the next single blaze before committing to a direction.
This is the marker I missed on that fourth hike. A double blaze is a trail telling you “don’t go straight on autopilot here.” Once you know that, you’ll never blow past one again.
3. Blaze Colors: “Which Trail You’re On”
Color is how trail systems distinguish between multiple overlapping trails. The general conventions vary by system, but a few are consistent enough to be useful:
White blazes are the primary marker for the Appalachian Trail, the most blazed long-distance trail in the country. If you’re hiking in the eastern United States on a trail near the AT corridor and see white rectangles, you’re likely on the AT or a connector to it.
Blue blazes on AT-adjacent trails almost always indicate side trails, approach trails to shelters, or spurs to viewpoints. Blue = you’ve left the main trail and are on something that branches off it.
Yellow blazes are used on many state park and national forest trails, particularly in the mid-Atlantic and Southeast. They’re often used for main trail routes when white and blue are already in use by intersecting long-distance trails.
Red and orange blazes appear on various regional trail systems: sometimes for main routes, sometimes for specific trail types (equestrian trails use orange on some systems, mountain bike trails on others). Red blazes on the Long Trail in Vermont mark the main route.
The practical rule: don’t assume a color means the same thing from park to park. Know the color of the trail you’re supposed to be on before you start, and follow that color consistently. If you’re suddenly seeing a different color than you’ve been following, that’s worth pausing for.
4. Cairns: “The Route Across Open Ground”
A cairn is a stack of rocks, usually three to eight stones balanced deliberately on top of each other, that marks a route where paint blazes aren’t practical. Above treeline, across rocky balds, through open meadow sections, or along riverbanks without trees, cairns take over the navigation role that blazes play in forested terrain.
Cairns are less reliable than painted blazes for one specific reason: people add to them. Hikers who think they’re being helpful build new rock stacks, sometimes in the wrong direction, sometimes in places that genuinely lead nowhere. On well-maintained trails, cairns are kept consistent by trail crews. On less-maintained routes, you can sometimes find clusters of rock stacks pointing in competing directions.
For beginner hiking, the key thing about cairns: they should be spaced close enough that you can see the next one from the current one. If you’re standing at a cairn and can’t see another one from it, stop. Don’t keep walking in a direction you’re guessing. Scan carefully in the expected direction of travel before moving forward. If visibility is good and you genuinely can’t find the next cairn, go back to the last reliable marker (a blaze, a sign, or a cairn you’re confident about) and restart from there.
5. Trail Signs and Junction Posts: “Where You Are and What’s Ahead”
Wooden signs, metal posts, and kiosk boards at trail junctions give you the most explicit information of any marker type: trail names, distances, and directional arrows. These are the markers beginners find most intuitive because they work like road signs.
A few things worth knowing about reading junction signs accurately:
Distances on trail signs are often rounded and can be optimistic. “2.3 miles to Summit” was measured by someone, but when, and using what method, and accounting for what variations, is often unclear. Use the number as a reference point, not a precise measurement.
At a junction with multiple options, always note which sign corresponds to which trail before you start moving. I’ve seen beginners read the sign correctly then walk the wrong direction because two trails departed at nearly the same angle and they didn’t double-check which one had the right blaze color.
Take a photo of the junction sign before you walk away from it. If you’re confused later about where you branched off, the photo tells you exactly what your options were and what you chose.
6. Confidence Markers: “Regular Check-Ins on Long Sections”
On longer trail sections between junctions, some trail systems install confidence markers — smaller blazes, reflective tacks, or simple painted arrows that appear more frequently than standard blazes to reassure hikers they’re still on track. Their sole purpose is to answer the question “am I still on the right trail?” without any new information beyond yes.
You’ll see these more often in areas where trails cross similar-looking terrain repeatedly: dense forest, multiple parallel drainages, open grassland. They’re common on night-hiking routes, where the increased frequency compensates for reduced visibility.
If you’re used to seeing confidence markers on a trail and they suddenly stop, that’s a signal worth heeding. Either the trail has become unambiguous enough that they weren’t placed, or you’ve moved off the marked route. Stop and verify before going further.
7. Colored Blazes on Shared-Use Trails: “Not Just for Hikers”
Many trail systems use color coding to distinguish between trail types on overlapping networks. This matters for navigation because following the wrong color on a shared-use trail can take you onto a mountain bike route or a bridle path that diverges from the hiking trail, sometimes significantly.
Common conventions, though these vary by park system:
- Blue markers or diamonds often indicate mountain bike routes
- Orange markers or horseshoe symbols frequently mark equestrian trails
- Green markers appear on nature or interpretive loops on some systems
- Hiker symbols (the stick figure walking) mark pedestrian-only routes on shared-use systems
When a trail junction sign shows symbols rather than just names, the symbols tell you which users each branch is designed for. Following the blaze color that matches hiking symbols means you’re on the path that was designed for foot traffic, which typically has the best maintained footing and the clearest navigation markers.
8. Paint Blazes on Rocks and Posts: When There Are No Trees
On exposed ridgelines, in desert terrain, and above treeline, you won’t find trees to blaze. Trail systems adapt: blazes get painted directly on rocks (look for paint dabs or arrows on boulders), metal or fiberglass posts get installed in the ground at intervals, or cairns take over entirely as described above.
Rock blazes are sometimes harder to spot than tree blazes because their color can fade and the viewing angle matters more. On a rocky ridgeline, you might need to scan at head height and below, looking for paint marks that are roughly trail-width apart. In good visibility they’re easy to follow. In fog, rain, or flat winter light, even experienced hikers slow way down on blaze-on-rock sections.
If you’re on a trail where paint blazes have been appearing on rocks and you suddenly can’t find the next one, the sequence to follow: stop, look in a wide arc, check behind you to verify the last one you saw, and look forward from that bearing before moving. Don’t stare at the ground, as rock blazes are typically placed at walking-height eye level or slightly above.
🥾 Trail Marker vs Boundary Paint
During field surveys along national forest perimeters, I have seen confused hikers follow red and blue forestry boundary rings painted around tree trunks, believing they were on an official trail. In my experience, authentic trail markers are clean rectangular blazes or carved Carsonite signs positioned along a cleared path. Continuous paint bands around tree circumferences indicate property lines, not public hiking trails.
What Trail Markers Don’t Tell You
Understanding what do trail markers mean also means knowing what they can’t tell you. Markers show you where the trail goes. They don’t tell you how the condition has changed since they were placed, whether a bridge washed out a mile ahead, whether the creek crossing that the trail profile shows is currently knee-deep from snowmelt, or whether the viewpoint spur at mile 3 has been closed for revegetation.
Trail markers are maintained on a schedule, not continuously. On well-funded trail systems (NPS, major state parks), that schedule is regular. On volunteer-maintained or lower-priority trail networks, a blaze might be faded, overgrown, or missing entirely at a critical junction. This is where recent AllTrails reviews become part of your navigation toolkit, not just your research. A review from two weeks ago that mentions “the junction at mile 1.8 has a missing sign, go right” is real-time information that no marker system can provide.
Download your trail map before you leave cell range. Not as a backup — as a standard practice. AllTrails works offline once the map has loaded, but only if it loaded while you had a signal. In the parking lot, before you walk to the trailhead, open the app and let the map fully render. That map, combined with what you now know about reading trail markers, covers most navigation situations on maintained trails.
Mistakes Beginners Make Reading Trail Markers
Assuming every well-worn path is the official trail. Use trails branch off maintained hiking trails constantly: social trails beaten by people cutting corners, old logging roads, deer paths that look like hiking trails for the first 200 feet. The presence of foot traffic doesn’t mean you’re on a marked trail. If you haven’t seen an official marker in a while, that’s diagnostic. Real trails get marked; social trails don’t.
Not paying attention to blaze color. On a trail where multiple routes converge, following the wrong blaze color takes you onto a different trail entirely, often without any dramatic announcement. If your trail uses yellow blazes and you’ve been following a blue one for 10 minutes, you’re on a different trail. Knowing the color of your intended route before you start is basic preparation that prevents this completely.
Walking straight through a double blaze. This is the most common navigation mistake on marked trails. A double blaze means something is about to change. It’s not decoration. It’s not a mistake. Stop, look carefully in both possible directions, find the next single blaze before committing to a direction.
Not looking up and at eye level. Beginners often watch their feet on uneven terrain, which is smart for footing but means they’re looking at the ground instead of the tree line where blazes live. Every 30 to 60 seconds on an unfamiliar trail, scan ahead at roughly shoulder to eye level. That’s where blazes and markers are placed.
Assuming cairns are always official. On popular trails, visitors add to cairns and build new ones constantly. An unofficial cairn on a social trail looks exactly like an official cairn on the marked route. On trails known for cairn navigation, this matters more. If a cairn seems to point toward terrain that doesn’t feel like trail, be skeptical. Backtrack to the last confirmed marker.
When Trail Markers Stop Being Optional Knowledge
Most beginner hiking happens on well-maintained trails where markers are frequent and clear. But three specific situations make trail marker literacy more than just nice to know:
Trails with poor recent maintenance. Volunteer-maintained trails on lower-priority land can have years between blaze painting cycles. Faded, overgrown, or completely missing blazes at junctions happen. Reading recent AllTrails reviews from the past 30 days tells you whether current hikers are reporting navigation confusion on a trail. If multiple recent reviewers mention missing signs or confusing junctions, that’s a trail where knowing how to use a downloaded map alongside your marker knowledge is worth having before you go.
Above-treeline or open-terrain sections. The shift from forested trail to exposed rocky terrain is where first-timers most often lose the trail. Blazes disappear. The cairns take over. If you’ve only navigated by painted blazes, a sudden transition to cairn navigation on a ridgeline in deteriorating weather is a hard place to learn. Know what cairns are, what they signal when they stop appearing, and what to do before you’re in that situation.

Trail junctions with poor signage. Particularly on older trails or routes that cross land ownership boundaries, junction signs get removed, stolen, or simply were never placed. A junction with two unmarked paths diverging at similar angles is a scenario where knowing to look for the blaze color of your intended trail, rather than just picking the more worn-looking path, can mean the difference between a clean hike and a confused one.
For any trail where navigation is unclear, the National Park Service or the relevant land manager’s site is your first resource for current trail conditions and marker information.
What do trail markers mean on most US hiking trails?
Trail markers indicate where a hiking trail goes, when it changes direction, and which trail you’re on when multiple routes intersect. The most common type is a painted blaze, a rectangle of paint on a tree at eye level. A single blaze means you’re still on the route. A double blaze means the trail is about to turn or fork. Colors distinguish between different trails on the same system.
What do hiking trail blazes look like?
Hiking trail blazes are typically 2-inch by 6-inch painted rectangles on trees, placed at roughly eye level (5 to 6 feet off the ground). On trails without trees, they appear on rocks or wooden posts. Trail blaze colors vary by system: white is standard on the Appalachian Trail, yellow is common in mid-Atlantic state parks, red appears on the Long Trail in Vermont. The color coding tells you which trail you’re on; the shape and configuration (single vs. double) tells you what to do next.
What does a double blaze mean on a hiking trail?
A double blaze, two paint rectangles stacked vertically on the same tree, signals that the trail is about to turn, junction with another trail, or do something non-obvious in the next 50 to 100 feet. When you see a double blaze, slow down and look carefully before continuing. Some systems offset the top blaze in the direction of the turn, but this convention isn’t universal. Find the next single blaze before committing to a direction.
What do trail blaze colors mean?
Trail blaze colors identify which specific trail you’re on in a system where multiple routes share terrain. On the Appalachian Trail: white = main trail, blue = side trails and approaches. On many state park systems: yellow = main route, blue or red = alternate or connector trails. Colors aren’t standardized nationally. Check the trail map or land manager website before your hike to know which color corresponds to your route.
What are cairns on hiking trails?
Cairns are deliberately stacked rock piles used to mark a trail’s route where painted blazes aren’t practical: above treeline, across rocky balds, through open meadows, or on boulder fields. They function the same way blazes do in forested terrain: they tell you the trail continues in a given direction. On a well-marked trail with cairns, you should be able to see the next cairn from the current one. If you can’t, stop and scan before moving forward.
What should I do if I can’t find the next trail marker?
Stop where you are. Don’t keep walking in a direction you’re unsure about. Turn around and find the last marker you are certain you identified correctly. Look forward from that position in the direction of expected travel and scan at eye level for the next blaze. If you genuinely cannot find the next marker after a careful scan, use your downloaded trail map to verify your position. On maintained trails, going back to the last confirmed marker and re-orienting from there solves most navigation confusion without escalation.
Trail Markers Work Once You Know the Language
What do trail markers mean, practically, for someone heading out on their first few hikes? They mean you have a communication system running in the background of every trail you walk. It’s telling you where to go, warning you when something changes, and confirming you’re still on track, but only if you know what to listen for.
A single blaze says keep going. A double blaze says pay attention. A color says which trail this is. A cairn says the route goes this way across open ground. That language is consistent enough across enough trails in the United States that learning it once applies almost everywhere.
The one preparation step that makes all of this easier: pull up your trail map, note the blaze color of your route, and download the offline map before you lose signal. Then you’re navigating with both systems working: the physical markers on the trail and a digital backup in your pocket.
Next Steps
- Right now: Look up your next trail on AllTrails or the land manager’s website. Find what blaze color the trail uses. Write it down or screenshot it. That’s your navigation anchor for the day.
- Before your first hike: Download the offline trail map on wifi at home. Open the app and let the map fully render before you leave signal range.
- On the trail: Every time you see a blaze, confirm it matches your expected color. Every time you see a double blaze, slow down and find the next single before moving forward.
Related Reads
Followed the wrong colored blaze for half a mile before realizing you’d been heading in the completely wrong direction? Here’s what trail blaze colors actually mean so a simple paint mark never sends you off course again.
Heard experienced hikers debate whether to tackle the climb at the start or save it for the end, and had no idea which side actually made sense? Here’s the real answer on hiking uphill or downhill first, and why the reasoning matters more than the preference.
Stacked a few rocks on the trail yourself because it seemed like a fun thing to do, not realizing it might confuse the next hiker behind you? Here’s what cairns on hiking trails actually mean and why adding your own can cause real problems.
Committed to a trail without realizing “out-and-back” meant you’d be walking the exact same path twice, uphill both ways? Here’s a breakdown of the different types of hiking trails so you know exactly what you’re signing up for before you start.
Kept choosing between hiking solo forever or awkwardly tagging along with people you barely know? Here are 6 methods for finding the right hiking partners near you that make the whole thing feel way less forced.